Clarifion Air Ionizer How to Clean It? 5-Step Detailed Process Guide
If you are wondering why maintenance is needed for the Clarifion air ionizer how to clean it, and get the most out of it? Then fret not, as I’ve researched and prepared the best cleaning guide. So, without further ado, let’s get started!
Quick Answer
When you notice any dust or debris on your or the operational sound of your unit increases, then cleaning your Ionizer is mandatory. It helps in running your unit effectively for fresh air quality. Here’s a quick overview of how you can do it:
Disassemble the unit;
Washing the collector plates;
Let your Ionizer dry;
Finalize the process by reassembling.
But these are the basics only. Continue reading to learn more essential details about the device cleaning process and 5 important signs marked cleaning necessity. Also, discover what to do when your device doesn’t work properly and Clarifion blue light is not on. Let’s dive deeper into it!
Clarifion Air Ionizer How to Clean It? 5-Step Detailed Process
If you want your air ionizer to neutralize nasty airborne particles effectively, regularly cleaning it is the key. So, with just a few straightforward, easy-to-follow steps, you can do it. Let’s explore them now.
Step 1: Dissemmble the Clarifion Air Ionizer
To clean the air ionizer:
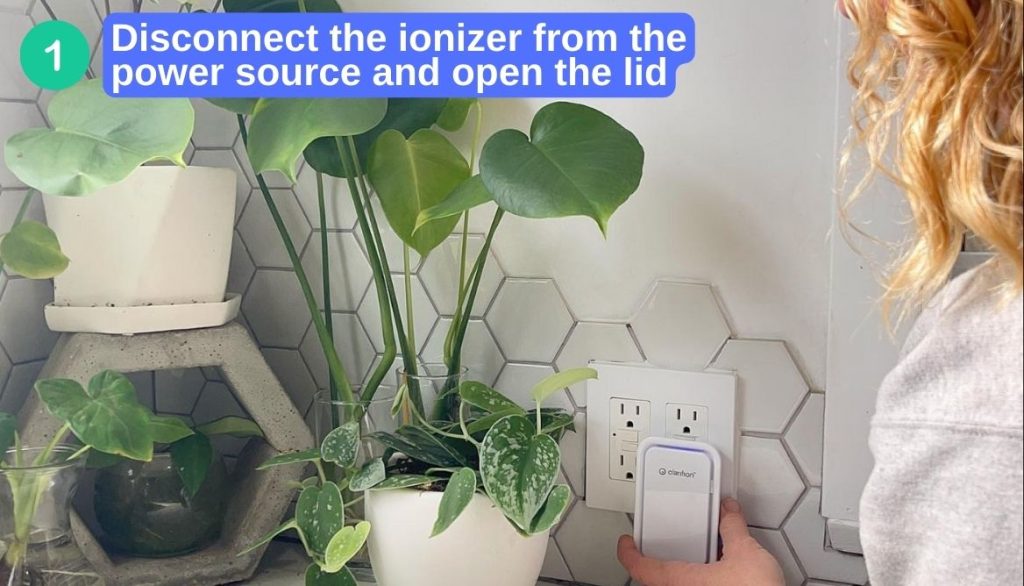
First, you need to ensure it is unplugged from the main power. This step is essential since it safeguards you from accidents like electroconduction and other potential harm.
After that, take off the front covering by simply pushing the unit’s side release buttons.
Once the front cover is removed, you can quickly access the ionizer needle and collection plates.
Step 2: Start the Cleaning Process
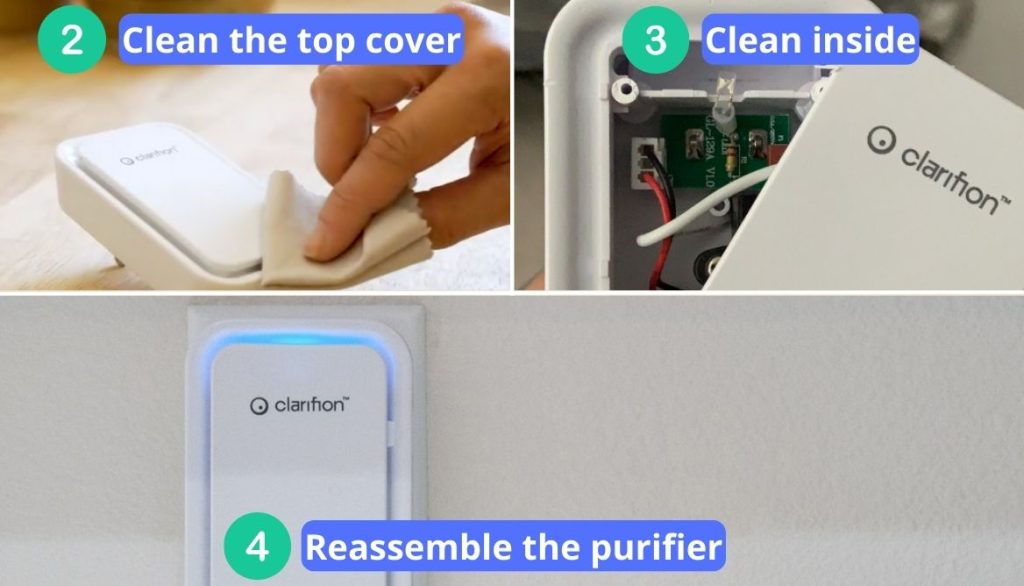
After disassembling the unit, you need to clean it thoroughly:
Grab a soft bristle brush or damp cloth to remove any dust, debris, or grime that has settled around the ionizer needle.
Clean the front cover and space around it using a moist cloth. With it, the cleaning process would be smoother to clean the dust or grime gathered over time.
Note: Be careful! Do not press down the ionizer needle too hard as it can break down.
Step 3: Wash the Collector Plates
Take off the collector plates and wash them thoroughly. Use a damp cloth or brush with soft bristles to remove dust or grime.
However, if you notice your collector plates having significant corrosion or damage, you might want to replace them with new ones!
Step 4: Reassemble the Ionizer
Once you’re done with the cleaning process:
Put together the collector plate and the front covering.
Next, secure the release button into position to close the device.
Give the device a few hours to completely dry it before using it again.
Note: It’s wise to be careful and wait a bit longer to prevent harming your device.
Step 5: Test Your Air Ionizer
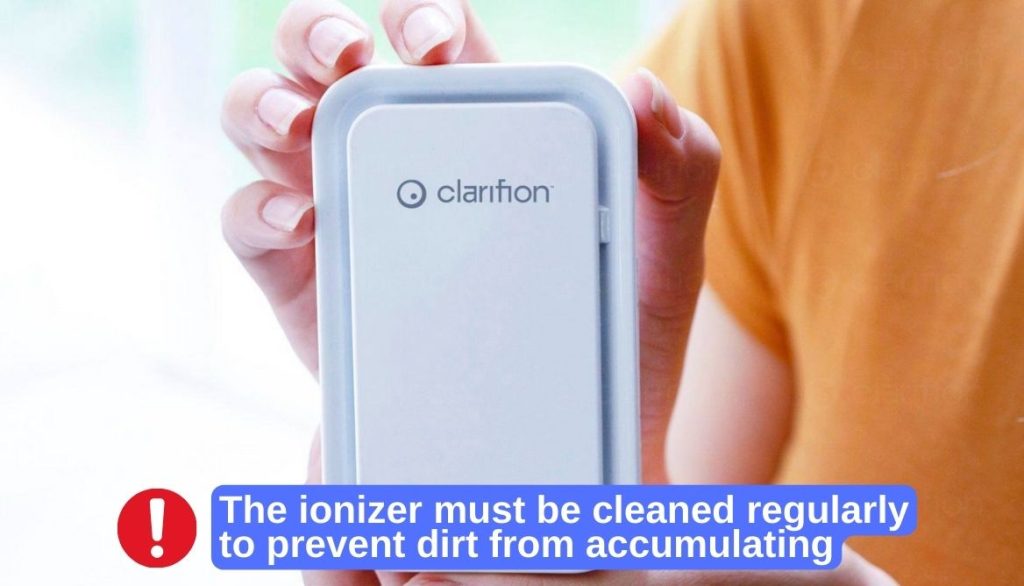
Once dried, plug it in and turn it on. Test the device to make sure it is still operating effectively. Since the ionizer’s maintenance is crucial, ensure you regularly clean it.
Note: I would recommend you clean the ionizer once every 3 months.
To learn more about air-ionizing technology, check out this helpful video.
Clarifion Ionic Air Purifier Comprehensive Cleaning Guide
Listed below is the step-by-step process to effectively clean Clarifion air purifiers to improve poor indoor air quality. Let’s dive into it!
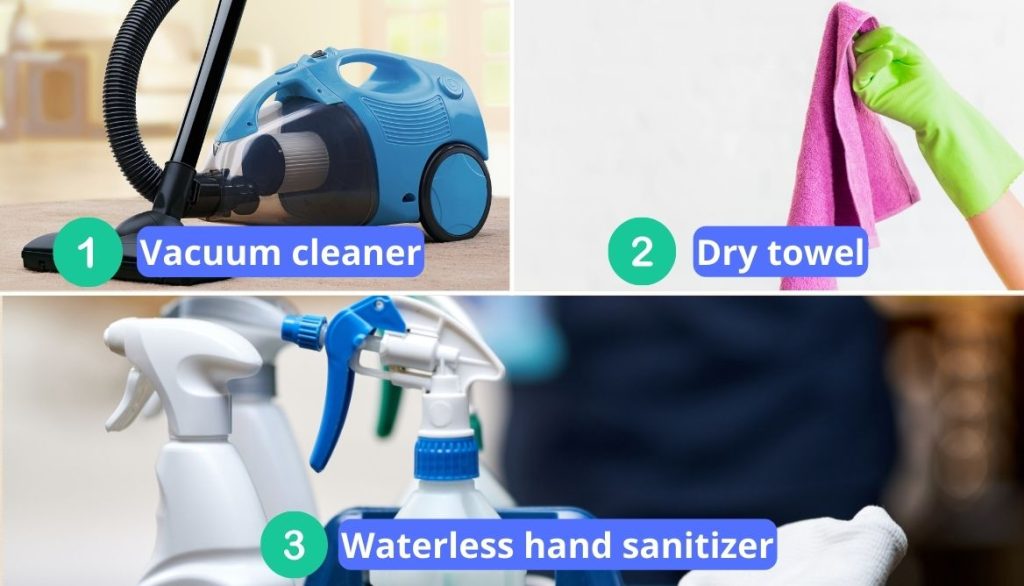
1. Grab Your Materials
To clean the air purifier and improve indoor air quality, you must gather some materials before starting the process. Although it doesn’t require many products, it is crucial to have a few at home. For instance:
Vacuum cleaner;
Dry towel;
Waterless hand sanitizer.
Once you have these things, you’re ready for the whole process.
2. Start Cleaning the Exterior
It is always better to start cleaning the purifier from the outside, and that’s what exactly we’re doing here. For this, do the following.
Unplug the device.
Wipe off the exterior with a dry towel.
You can also use a little water to dampen the cloth if there is grime on the device, and it won’t get away with a dry towel.
Remember not to use soapy water to clean it since it can damage your device.
3. Remove the Filter Cover
The next thing to do is to give the air purifier a good wipe-down inside and out. Here’s how you can do it:
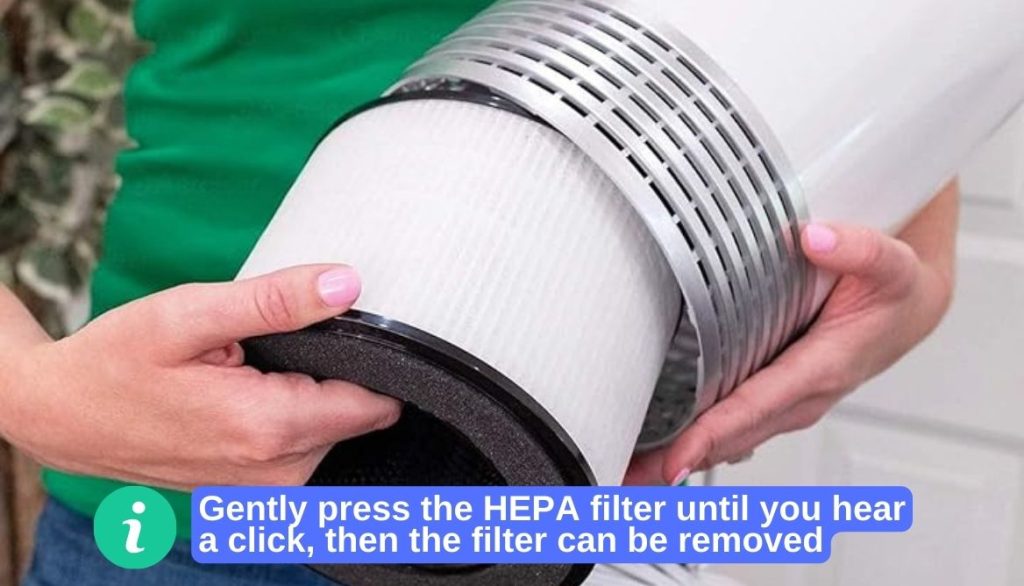
First, take off the filter cover.
Gently press the HEPA filter until you hear a click. It indicates that the air purifier has been opened.
Removing the filter, you can get access to the purifier’s inner unit, making it easy for you to do the thorough cleaning.
One thing you should remember during this stage is to make yourself safe from potentially dangerous substances by wearing a mask.
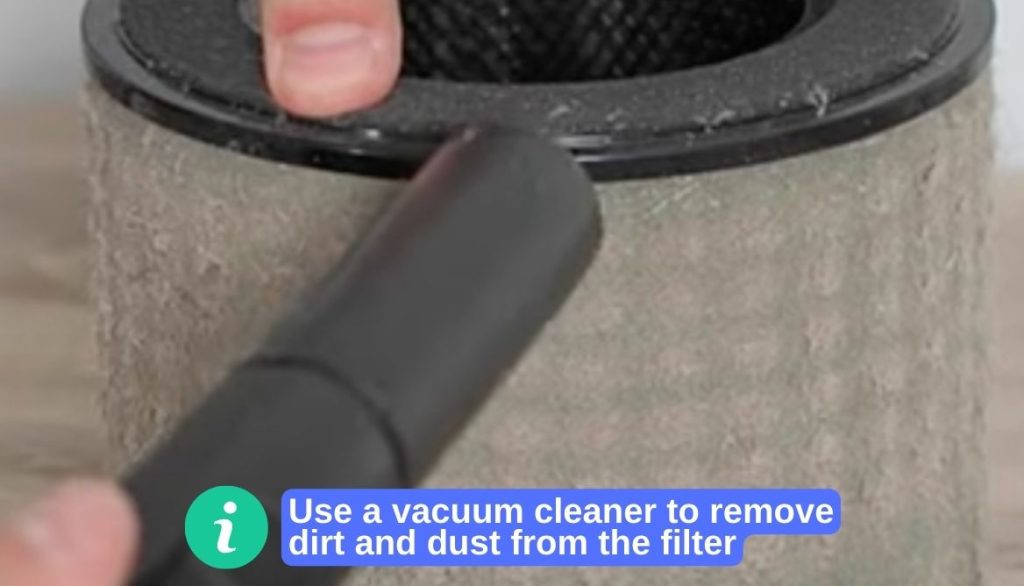
4. Remove the Dust With the Help of A Brush or Vacuum Cleaner
Now that you can see inside the air purifier, you may clean off the dust that has settled within. For this, do the following.
Grab a brush or vacuum cleaner and wipe off the dust and debris.
As an alternative, you can use a cloth to get rid of dirt as much as possible.
Important! However, when cleaning the interior, make sure you’re not damaging the delicate internal components.
5. Clean the Purifier’s HEPA Foam Pads
The HEPA filters in this mini air cleaner come with foam pads that must be replaced and cleaned routinely. Now, you must be thinking of how to clean it. Then, they are easy to maintain:
You only need to wipe them off with a moist towel.
When working, instead of water, use a waterless hand sanitizer on the cloth to avoid damaging the air purifier.
In addition, you also need to dry all parts thoroughly before reassembly for maximum security.
6. Replace the Air Purifier Filter
If your filter is not getting clean with the moist cloth, replace it with a new one to get the purified air. You won’t do this often, but it depends on how often you use the device.
Note: As a general rule, your Clarifion HEPA filter should be replaced every 3 – 6 months.
4 Important Signs Your Clarifion Air Purifier Needs Cleaning
Recognizing when your Clarifion Air Purifier needs cleaning is essential to ensure it continues to operate effectively. Here are some signs to look out for:
Reduced Airflow: If you notice a decrease in the airflow coming from the air purifier, it may be a sign that the filter or electrostatic plates are clogged with dust and particles. This reduced airflow can result in less efficient air purification.
Strange Odors: If your air purifier emits unusual or unpleasant odors, it could be due to accumulated contaminants on the filter or plates. Cleaning these components can help eliminate odors.
Visible Dust or Debris: Inspect your air purifier’s exterior and interior components. If you see visible dust or debris buildup on the intake and outlet vents, it’s time for a cleaning.
Increased Noise: An unusually loud or noisy operation can indicate that the fan or other internal components struggle due to dirt and dust buildup. Cleaning can restore normal, quieter operation.
How to Open a Clarifion Air Purifier?
To open a Clarifion air purifier, follow these instructions:
Unplug the purifier and turn it upside down
The next step is unlocking the base cover. You can do it by rotating it anti-clockwise.
Once, the base cover is removed, you can pull out the filter. You can clean it or replace it based on your need.
When you are done, put the filter back and close the base cover.
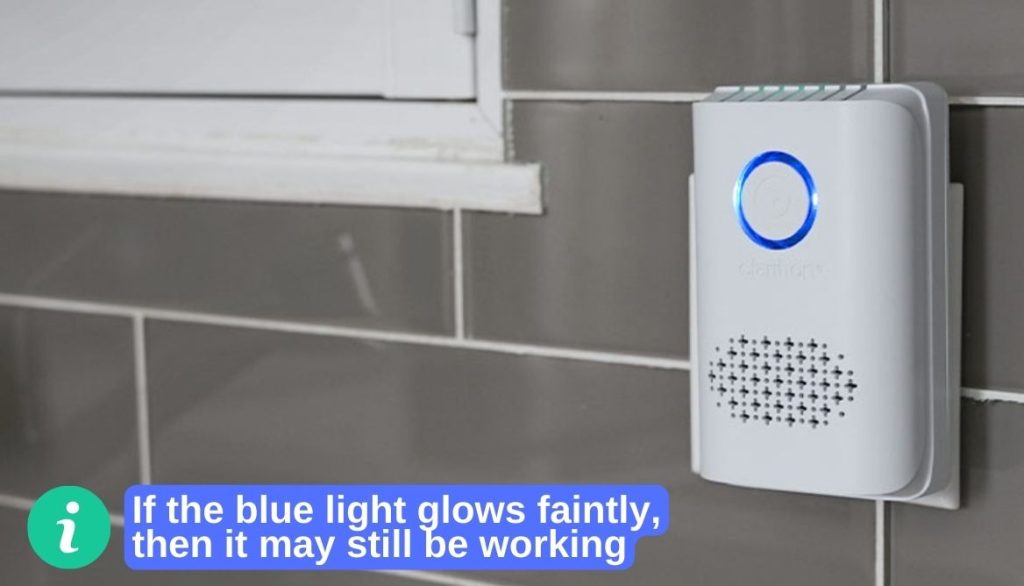
Troubleshooting The Clarifion Blue Light Not On
It can be a concern when you encounter the issue of the Clarifion blue light not on. The light indicates the air purifier is operational and actively purifying the air.
Here’s a troubleshooting guide to address this problem:
Check Power Connection: The first step is to ensure the Clarifion air purifier is appropriately plugged in and receiving power. Confirm that the electrical outlet is working by testing it with another device. If the outlet is functional, move on to the next steps.
Inspect the Blue Light Indicator: Examine the blue light itself. Sometimes, it may be dim or difficult to see in well-lit rooms. If the blue light is very faint, it may still be operational. Try briefly covering the sensor with your hand to see if the light becomes more visible.
Consult with the support team: If the outlet is in good working order and there is indeed no blue light on the unit, the Clarifion has most likely failed. If this is the case, please contact customer service for a quick solution.
FAQs
How Often Do You Need to Replace a Clarifion Air Ionizer?
There’s no need for a replacement. Clarifion uses electrostatic plates to capture particles and does not have a traditional filter that needs replacing. However, you may need to clean the electrostatic plates regularly to maintain their effectiveness in fighting microscopic airborne contaminants.
Do You Have to Clean The Clarifion Air Ionizer?
Yes, cleaning the Clarifion Air Ionizer once every 3 months is recommended for enhancing air quality. Cleaning helps remove accumulated dust and other air pollutants from the electrostatic plates, ensuring optimal performance.
How Do You Clean an Ionizer Filter?
To clean an ionizer filter in a Clarifion Air Purifier, turn off and unplug the unit, then gently wash the plates with warm, soapy water using a soft cloth or sponge. Once it is rinsed thoroughly, allow the device to dry completely before turning it on.
Conclusion
Let’s revise! Maintaining your Clarifion Air Ionizer is the key to ensuring it delivers clean and fresh air to your space. Regular cleaning it with a brush and vacuum cleaner and, when necessary, replacing components like the electrostatic plates or filters will keep it operating at peak efficiency.
When it comes to your Clarifion air purifier, it needs cleaning if you notice low airflow, strange odors coming out of the unit, or increased operational sound. You can do the cleaning by wiping out the external body and then cleaning or replacing the filters. Also, use a vacuum or brush to get rid of accumulated dust.
Lastly, if you encounter a blue light on your Clairfion, ensure proper power connection and check for error codes.
Danny is a passionate writer who loves to share his knowledge about air purifiers. He’s been writing for 10 years, and he’ll share all that experience with Very Well Home viewers to help you make the best decision when it’s time to buy an appliance!